")
Send & Receive SMS and WhatsApp using Power Automate (Start Free)
Consultant at Bright Ideas Agency | Digital Transformation | Microsoft 365 | Modern Workplace
Are you interested in sending or receiving SMS messages using your Power Automate flows?
Power Automate, a powerful tool in Microsoft's suite, offers an efficient way to automate various tasks and workflows. One of its versatile functionalities includes the ability to send SMS messages through Twilio, a popular cloud communications platform. This integration can significantly enhance business processes, allowing for immediate communication with customers or team members. This one of the best way to do this on Power Platform
To start, you need an active Twilio account. Upon registration, Twilio provides an Account SID and Auth Token, which are crucial for authentication purposes. Additionally, you must acquire a Twilio phone number, which will be the sender of your SMS messages.
Once your Twilio setup is complete, log into your Power Automate account and create a new flow. Power Automate offers different types of flows, such as automated, instant, or scheduled, allowing you to choose the one that best fits your needs. Next, define a trigger for your flow. This trigger could be anything from a button press in an app to a specific time of the day.
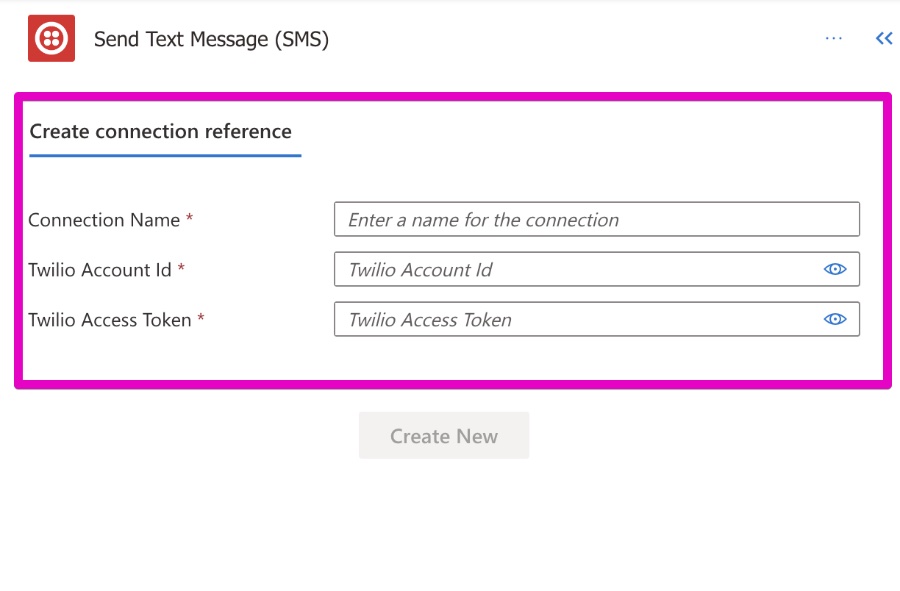
After setting up the trigger, add a new step to your flow by searching for the Twilio connector. This step is where you configure the SMS action. You will need to input your Twilio Account SID, Auth Token, the Twilio phone number (as the sender), the recipient's phone number, and the message content.
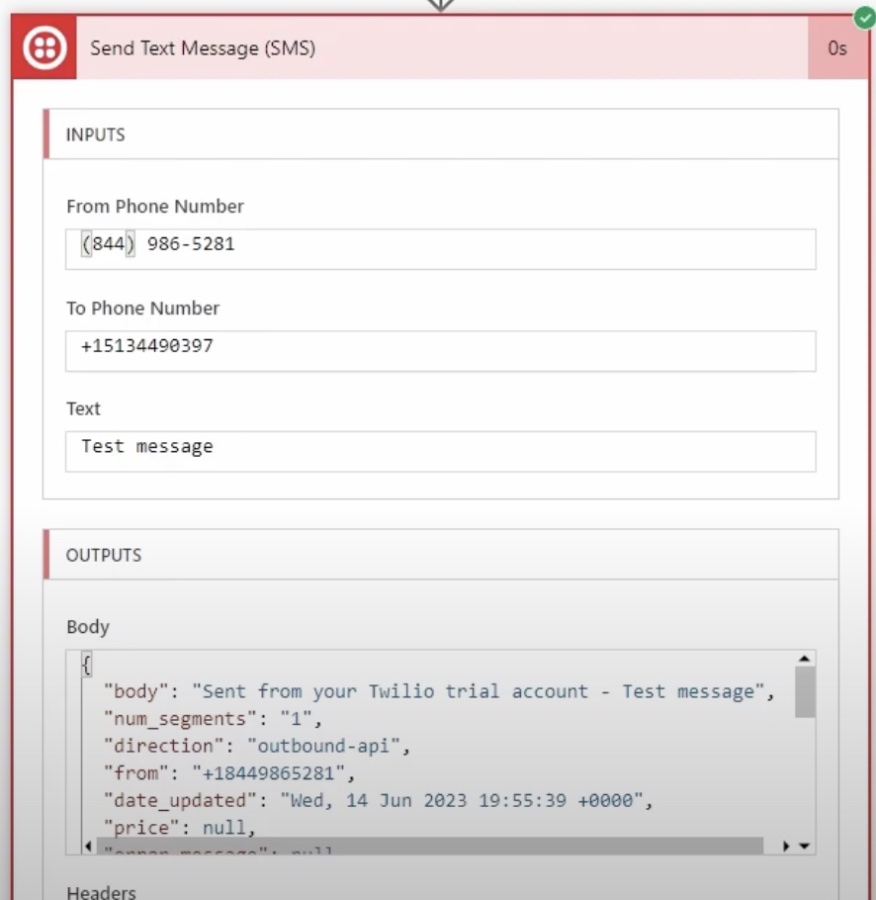
Once everything is set up, it's crucial to test the flow to ensure it works as expected. If everything is configured correctly, your SMS message will be sent successfully whenever the trigger conditions are met. This setup not only automates the process of sending SMS messages but also integrates seamlessly into your existing workflows, making communication more efficient and reliable.
In summary, using Power Automate in tandem with Twilio for sending SMS messages is a powerful way to enhance communication within business processes. It offers a streamlined, automated approach to sending timely notifications or information, adding significant value to business operations.
Steps to Setup SMS Gateway in Power Automate
To send an SMS from Power Automate using Twilio, you'll need to follow these steps:
- Create a Twilio Account: If you don't already have one, sign up for a Twilio account and get your Account SID and Auth Token. These are essential for authentication.
- Get a Twilio Phone Number: From your Twilio dashboard, acquire a phone number that will be used to send SMS messages.

- Log in to Power Automate: Access your Power Automate account
- Create a New Flow: Choose to create an automated, instant, or scheduled flow, depending on your needs.
- Add a Trigger: This could be a button press, a schedule, or another event in your Office 365 environment.
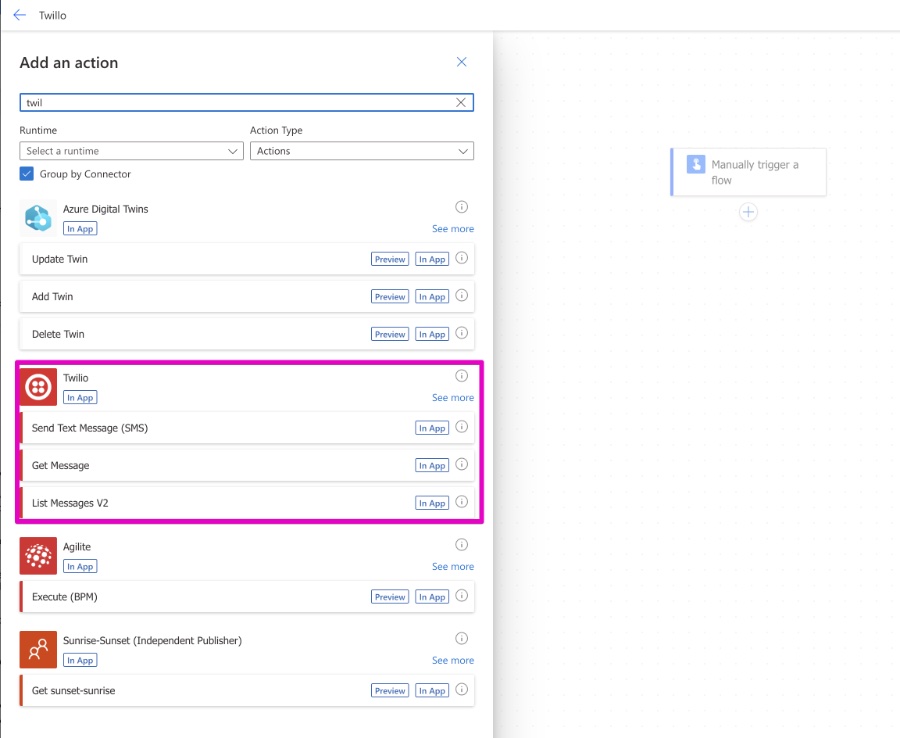
- Add a New Step for Twilio: Search for the Twilio connector and add it to your flow.
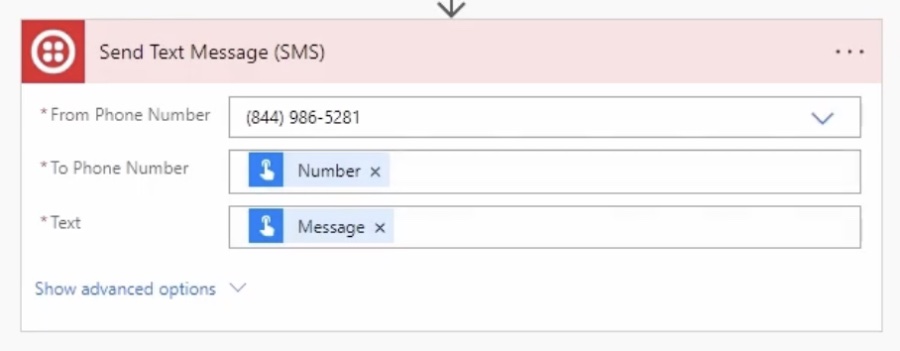
- Configure Twilio Action: Select 'Send Text Message (SMS)' and input the necessary fields:
- Account SID
- Auth Token
- From (Twilio Number)
- To (Recipient's Number)
- Message (Your SMS content)
- Save and Test Your Flow: Make sure everything is set up correctly and test your flow to ensure the SMS is sent successfully.
How to connect this Flow to SharePoint Online?
To connect SMS sending to SharePoint using Power Automate, you can create a flow that triggers an SMS when a specific event occurs in SharePoint. Here’s a step-by-step guide to set this up:
- Set Up SharePoint: First, ensure you have a SharePoint list or library where the desired event will occur. This could be adding a new item, updating an item, etc.
- Create a New Flow in Power Automate: Log into Power Automate and create a new automated flow.
- Choose SharePoint Trigger: Select a trigger related to SharePoint, like ‘When an item is created’ or ‘When a file is modified’. Configure the trigger to point to your specific SharePoint list or library.
- Add an Action to Send SMS: After the SharePoint trigger, add a new step to send an SMS. You can use Twilio or another SMS service that Power Automate supports. If using Twilio, you’ll need to provide details like Account SID, Auth Token, From and To numbers, and the message body. The message can be dynamic, including details from the SharePoint item that triggered the flow.
- Configure Additional Logic (Optional): You may want to add conditions or additional actions depending on your requirements. For instance, only sending an SMS if certain criteria are met in the SharePoint item.
- Save and Test the Flow: Save your flow and test it to ensure that it works as expected. You can do this by triggering the SharePoint event and checking if an SMS is sent.
Summary: Connecting SMS Sending to SharePoint
Integrating SMS sending with SharePoint in Power Automate involves creating a flow triggered by SharePoint events, followed by an action to send an SMS using a service like Twilio. This setup enables automated, real-time notifications or communications based on activities in a SharePoint list or library.
What are another alternative Way to send SMS and with Power Automate?
Another alternative for sending SMS messages from Power Automate, besides using Twilio, is through an Email-to-SMS gateway. This method involves sending an email from Power Automate which is then converted into an SMS message by the recipient's mobile carrier. Here's how it works:
- Find the Carrier's Email-to-SMS Gateway: First, you need to know the recipient's mobile carrier and their specific email-to-SMS gateway address. This address typically looks like a combination of the recipient's phone number and a domain specific to the carrier.
- Create a New Flow in Power Automate: Similar to the Twilio method, you start by creating a new flow in Power Automate.
- Set Up an Email Trigger or Action: Depending on your flow, configure an email trigger or action. You will use this to send an email to the carrier's SMS gateway.
- Format the Email: The recipient's phone number, followed by the carrier's gateway domain, will form the "To" address of your email. The body of the email will be converted into the text message.
- Test Your Flow: Ensure the setup works by testing the flow. If configured correctly, when the flow is triggered, it will send an email to the gateway, which then forwards it as an SMS to the recipient's phone.
This method is particularly useful if you're looking to avoid additional costs associated with SMS gateway services like Twilio, as it typically only involves the cost of sending an email, which is often free. However, it's important to note that the reliability and delivery speed can vary, and not all carriers support email-to-SMS gateways.
As an alternative to Twilio, Power Automate can send SMS messages via an Email-to-SMS gateway. This method requires knowledge of the recipient's mobile carrier's gateway address and involves sending an email that is converted to an SMS. While this can be a cost-effective solution, it may vary in reliability and speed, and carrier support is not universal.