
How To Unhide All Rows In Excel
Reveal Hidden Excel Rows: Simple Steps to View All Your Data!
To reveal all rows in a spreadsheet, the procedure is straightforward. Start by selecting the entire worksheet with a click on a row header that is showing. Then, use the keyboard shortcut Ctrl + A (or Cmd + A on a Mac) to highlight all cells, including any that are hidden.
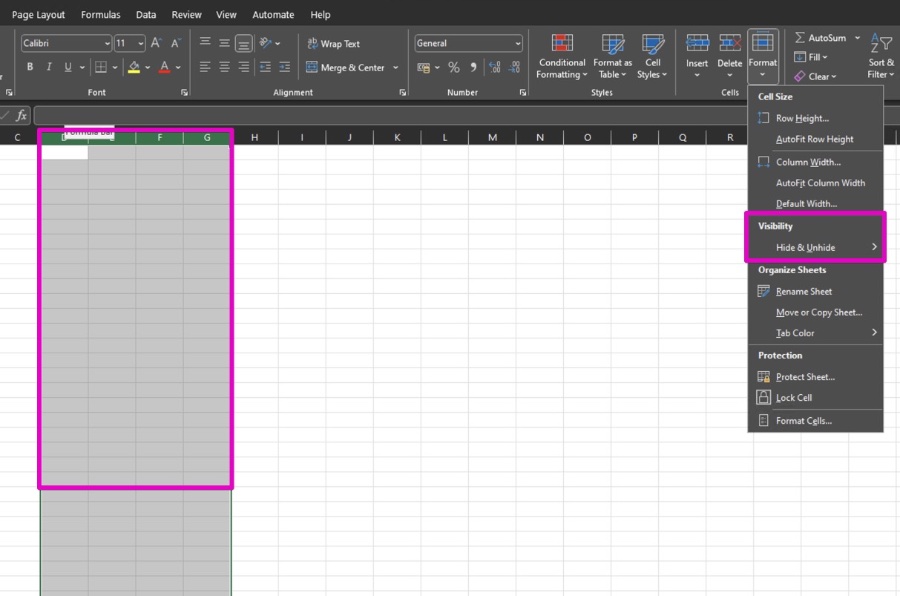
After the cells are highlighted, simply right-click and choose 'Unhide' from the menu. This action will make all your rows visible. Following this method will ensure you can see all data in your spreadsheet without missing anything hidden.
If you're managing a large or complex spreadsheet, an alternative method is at hand. Access the "Go To" feature in your spreadsheet application by pressing Ctrl + G. In the dialog box that appears, select 'Special...', choose 'Visible cells only', and hit OK.
This will select only the cells that are not hidden. Then, right-click on any of your row numbers and select 'Unhide' to reveal hidden rows. For users comfortable with VBA scripting, a simple script could automate this process, although this requires some familiarity with the programming environment.
Keep in mind, if you're working with a protected workbook, it may be necessary to remove protection before you can unhide rows. Ensuring your workbook is not protected will allow you to modify it freely and complete tasks such as unhiding rows without unnecessary obstacles.
- Open your Excel workbook where hidden rows need to be exposed.
- Select all rows by clicking on the top-left corner triangle of the worksheet.
- Right-click on the row numbers and select 'Unhide', revealing all hidden rows in the sheet.
These steps are ideal for making quick adjustments to your spreadsheet, ensuring you have a complete view of your data. The ability to see all your information is crucial for accurate data analysis and decision-making.
Enhancing Visibility in Spreadsheets
Efficient data management often requires you to have a clear view of all the information in your spreadsheet. Knowing how to unhide rows ensures that no data remains concealed, allowing for comprehensive analysis and use. This instruction streamlines the task, making it accessible even for those with minimal technical background.
Unhiding Rows in Spreadsheet Programs
Revealing hidden rows in spreadsheet applications is a straightforward process. Begin by selecting the row header of any visible row to highlight the whole worksheet area. Then activate the selection of all cells by using Ctrl + A on Windows or Cmd + A on macOS, which includes hidden rows and columns.
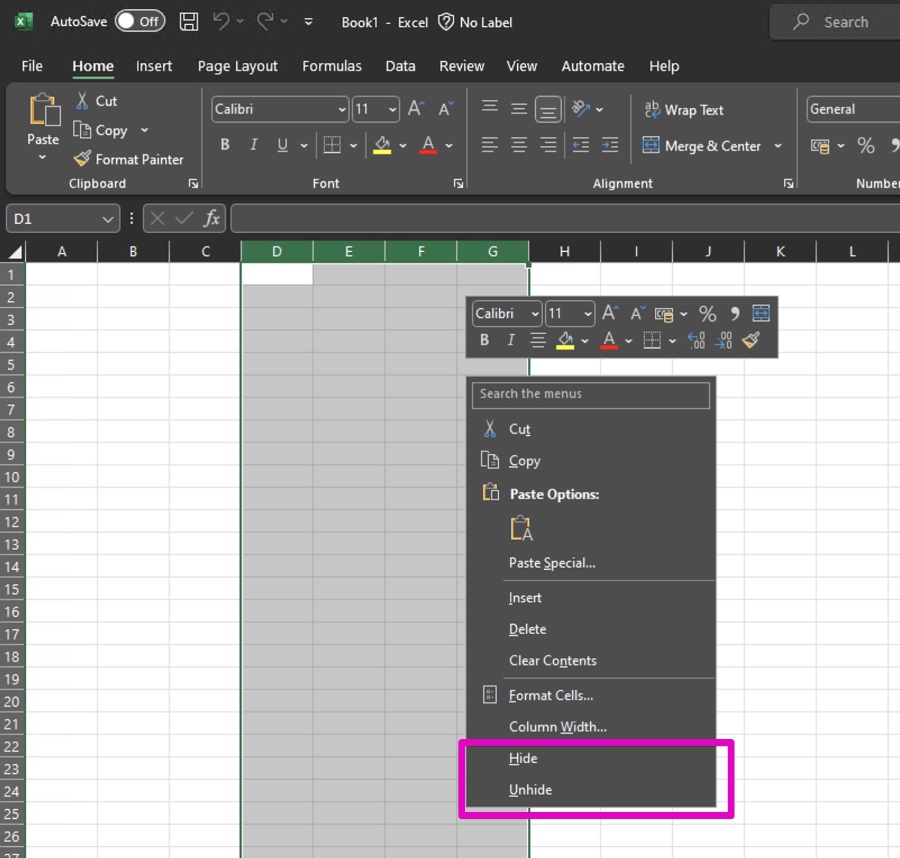
Proceed by clicking with the right mouse button on any selected cell, and choose 'Unhide' from the resulting menu. With this, all previously concealed rows will become accessible and can be worked with as needed.
- Open the Data File: Start by opening the workbook that holds the rows you wish to reveal.
- Highlight All Rows: Look for the small triangle icon where the row and column headers intersect, and click it to select every cell.
- Perform the Unhide Action:
- Right-click on the row numbering.
- Select "Unhide" from the context menu that appears.
- All hidden rows will now be shown.
For extensive workbooks, where the usual method is inefficient, an alternate technique using the 'Go To' feature may be employed:
- Open the 'Go To' dialog by pressing Ctrl + G.
- Click on "Special…" button.
- Opt for "Visible cells only" and acknowledge with OK.
- The cells that are not hidden will get highlighted.
- Afterward, by right-clicking on the row headers, the 'Unhide' option can be selected.
VBA scripting offers another possibility for unhiding rows, requiring a fundamental grasp of the VBA environment in the program. Keep in mind, if the sheet is protected, that protection must be removed before carrying out the unhide operation.

People also ask
Why can't I unhide my rows in Excel?
Rows may not unhide in Excel if they are very small or if there's an issue with the workbook. To solve this, check for any filters or grouped rows, make sure no rows are set to a minimal height, and look for any active rows that might have a zero height setting. You can also try selecting the rows on either side of the hidden rows, right-click, and choose "Unhide."
How do I unhide an entire Excel spreadsheet?
To unhide all elements in an Excel spreadsheet, you'll need to select the entire sheet by clicking the triangle in the corner where the row and column headers meet. Then, right-click on the row or column headers and choose "Unhide." This should reveal any hidden columns and rows.
How do I unhide all rows in sheets?
Similar to Excel, to unhide all rows in Google Sheets, click on the square to the left of the column labels and above the row labels to select all cells. Then, right-click on the row numbers and click "Unhide rows." If you're dealing with filters, you may need to disable them to see all the rows.
How do I find hidden rows in Excel?
To find hidden rows in Excel, you can use the "Go To" feature. Press F5, click "Special," choose "Visible cells only" and then click "OK." Another method is to scan the row numbers on the left side of the worksheet for any missing numbers, indicating hidden rows. Additionally, look for a double line on the row header which may suggest a hidden row in between.
Keywords
unhide rows Excel, show all rows Excel, Excel unhide rows shortcut, display hidden rows Excel, Excel reveal rows, Excel row visibility, unhide multiple rows Excel, Excel unhide all, Excel spreadsheet show rows, Excel row unhide command