- All of Microsoft

HTML & CSV Table Creation in Power Automate
Learn how to create HTML & CSV tables in Power Automate step-by-step, ideal for exporting data, briefing emails and much more.
In this blog post by Lewis Baybutt [MVP], he provides detailed guidelines on creating HTML and CSV tables in Power Automate, Microsoft's tool for automating and optimizing time-consuming or repetitive tasks. The post essentially explains the process of making HTML and CSV tables, which can be effectively used to represent complex data sets or large amounts of information in a simple, organized way.
The blog post begins by discussing the importance and need for creating HTML or CSV tables in Power Automate. Potential use cases include exporting data from a canvas app or delivering briefing emails with selected records of data on a daily basis. It's an efficient way to present outstanding work or cases, needing review.
Firstly, the author guides on how to gather relevant data. In this case, a SharePoint list with few records serves as the data source, and a 'get items' action is performed against this list.
Next, Lewis Baybutt dives into the creation of a CSV table. The action to 'Create CSV table' within the flow is added. The input 'from' for creating the CSV table can be 'value' for the list of items. There are two options for displaying data on the CSV table - "automatic" and "custom". The author selects "custom" choosing to input headers and match values from the data set.
Once the CSV table is created, it needs to be stored. The blog guides on using the 'create file' step using the OneDrive for Business connector. After giving the file a name and adding a ".csv" extension, the 'output' dynamic content from the create csv table action is used.
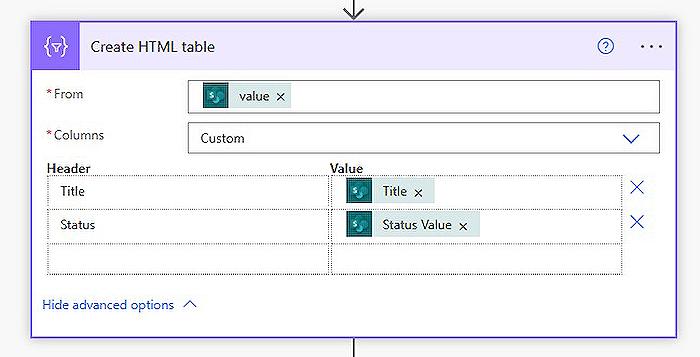
In a different scenario, the author also explores how to create a HTML table, especially effective if one wants to produce a file as a pdf with a table inside or send a table through an email. Despite functioning differently, the process remains almost identical to that of creating a CSV table.
After creating a HTML table, it can be easily embedded in an email and sent to an individual's inbox. The author also touches on styling the table using CSS for a better visual presentation.
For more detailed, step-by-step instructions on creating HTML & CSV tables in Power Automate, with useful screenshots, check out the full post here.
Overview
Power Automate is a powerful tool by Microsoft that enables users to automate tedious or time-consuming tasks, like creating HTML or CSV tables. It helps convert complex or substantial data into simple, organized formats. This capability is especially beneficial for different scenarios like data exportation, briefing emails, and reports. These tables can be conveniently embedded in emails for easy sharing and even aesthetically styled using CSS for better appeal.
Read the full article Creating HTML & CSV Tables in Power Automate
Learn about Creating HTML & CSV Tables in Power Automate
In today's world, data is crucial and most businesses need to move, sort and analyze bulk data on a regular basis. As such, automation and efficiency have become the hallmark of any successful business operation. Among a plethora of tools available, two prominent ones stand out - HTML tables and CSV tables. This blog provides a comprehensive guide on creating HTML & CSV tables using Power Automate, encapsulating the basics of grabbing the data and using it to perform some useful actions.
- Why choose Power Automate to create HTML & CSV tables?
This tool offers a myriad of use cases. For instance, you might need it to produce data exports from within a canvas app and deliver them in specific file formats like pdf or csv. Or, you may need to deliver briefing emails containing selected record data daily as a reminder of outstanding work or cases to look over.
- Getting Data and Creating a CSV Table:
To begin with, you need to have your data ready. You could fetch data from a SharePoint list depending upon how large the dataset is. Once done, you can create tables using 'Create CSV table' action in Power Automate. In your ‘from’ input for creating the csv table action, you can use ‘value’ for your list of items if you’re drawing from a SharePoint list. This action gives users the flexibility to either let the function decide which data to display or choose it themselves, thereby adding yet another feather to Power Automate's cap.
- Storing the CSV Table:
Once you've created the CSV table, the next step is storing it, possibly in a CSV file. This can be done by adding a 'create file' step to Power Automate flow and using the OneDrive for Business connector.
- Creating an HTML Table:
Pivoting to a different scenario where you might want to produce your file as a pdf with a table inside, or even send the table in an email, Power Automate facilitates this with HTML table feature. Similar to creating a CSV table, you can use your array of objects to create the HTML table using HTML table action. Again, you can choose between letting Power Automate decide which columns to use or define your own columns.
- Sending the HTML table in an Email:
Once the HTML table is ready, you can easily include it in an email and deliver it to someone’s inbox. This can be done by adding a 'Send an email' step using the Outlook connector.
- Styling the HTML Table:
If you wish to enhance the look of your HTML table, Power Automate allows you to do so using CSS. You can create your own CSS or use the provided code.
In conclusion, Power Automate is a powerful tool for automating your regular tasks and the creation of HTML and CSV tables. It's straightforward, and with a bit of practice, you can master these skills in no time.More links on about Creating HTML & CSV Tables in Power Automate
- HTML Editors
- We believe that using a simple text editor is a good way to learn HTML. Follow the steps below to create your first web page with Notepad or TextEdit. Step ...
- Create HTML Page
- Create Html Page · Step 1: Open the Text Editor · Step 2: Type the HTML code. · Step 3: Save the HTML code. · Step 4: Run the HTML file.
Keywords
Power Automate HTML Tables, CSV Tables in Power Automate, Creating Tables Power Automate, HTML Power Automate, Power Automate CSV, Power Automate Table Creation, Automate HTML & CSV Tables, Power Automate Create Tables, Power Automate HTML CSV, Power Automate Table-HTML CSV.