- All of Microsoft

How to add an image in Grid view to Microsoft list
Boost your Microsoft Lists efficiency with Grid view: Add images, interact with data, customize displays for structured list management.
Demystifying the process of adding an image to a GridView in Microsoft Lists is the top-tier tutorial presented in this intriguing YouTube video by the Microsoft MVP, Ami Diamond. Walkthrough this simple process and elevate the aesthetics of your Microsoft lists. Here's how it's done.
Grid view is a feature in Microsoft Lists that allows you to display list items in a tabular format. It allows you to view and interact with the data in your list in a more structured and organized way.
In grid view, each row represents a list item, and each column represents a field or property of the list item. You can use the grid view to filter, sort, and group list items based on specific criteria, as well as to add or edit list items directly in the view.
To use grid view in Microsoft Lists, you need to open the list and click the "Grid view" button in the top right corner of the screen. This will switch the view to grid mode, and you can then use the various controls and options available to customize the display of the data.
More about the new List Features
First and foremost, navigate to your selected Microsoft List. The opening shot of the YouTube tutorial is powerful, showcasing a neatly organized Microsoft list that extends its usability through well-placed images. However, these are not present by default.
To enrich your Lists with images, you need to switch your viewing mode from List view to Grid View. Ami clearly explains this as she walks you through the user interface. Switching to Grid View offers a more visual and intuitive user experience.
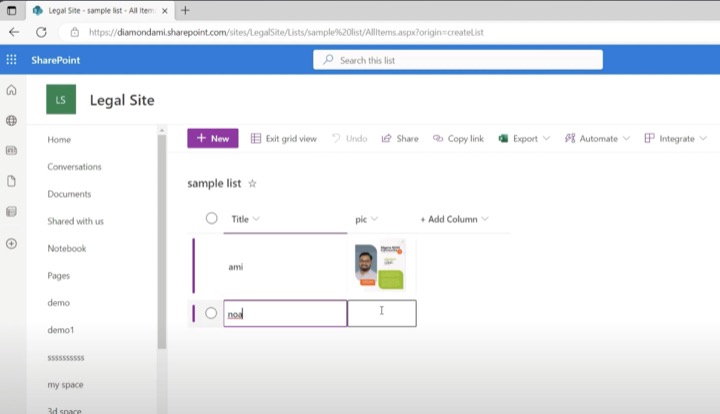
The next crucial point detailed in this instructional video is about adding a column in the Grid view. Ami takes you through this step, showing precisely how to accomplish it. An important point to note here is that images can only be added in the Grid view, thus adding a column here is essential.
Now, once you have successfully created a column in your Grid view, you proceed to actually add an image. To do that, you need to click on a button under the new column and select an image of your choice. Upload the image, and voilà, your list has now been visually enhanced.
The final part of the tutorial is about adjusting and saving your changes. Once your image is uploaded, ensure you click on 'Save' to make sure your preferences are updated. This is highlighted adequately in the tutorial for everyone's understanding.
Ami makes sure to explain each step concisely, making the entire process seem effortless. The video design is superior, ensuring a seamless viewing and learning experience. Thus, makes the process of how to add an image in Grid view to Microsoft Lists simple and efficient.
Expanding on Microsoft Lists
Microsoft Lists, an integral part of the Microsoft 365 suite, is an exceptional tool for creating, sharing, and tracking information. With its ability to use custom views, incorporating images, color-coding, and more, it facilitates visually-driven organization and productivity. From workflow visualization on a digital kanban board to fleet tracking with the integrated map view, Lists offers a wide-ranging set of capabilities to businesses and individuals. Importantly, its seamless integration with Teams, Outlook, and other tools in the Microsoft environment enables streamlined collaborative effort.

Learn about How to add an image in Grid view to Microsoft list
The video on YouTube covers how one can add an image in Grid view to Microsoft Lists. Microsoft Lists is a Microsoft 365 app that helps you track information and organize work. The information compiled in Microsoft Lists is stored in SharePoint. Whether simple or complex, you can design Microsoft Lists to your specifications.
Grid view is a specific feature in Microsoft Lists that allows you to display your list items in a tabular format. In essence, each row represents a different list item, and each column represents a unique field or property of that list item. This format enables you to view your list applications in a more structured and easy-to-understand manner.
How do you apply grid view to Microsoft Lists? Firstly, you would need to open the list. On the top right corner of the screen, you will find the "Grid view" button. Clicking that button will convert the display of your list data into a grid format, allowing you to utilize a range of controls and options to customize how your table data appears.
Another feature of Microsoft Lists discussed in the video is being able to add an image. This allows you to enhance the visual appeal of your list and make it more informative. The video covers how to do this with detailed steps and examples.
- Create Lists from Templates
- Favorite Your Frequently Updated Lists
- Create New Lists from Existing Lists
- Utilize the Microsoft Lists iOS App
- Add List Applications as Channel Tab in Microsoft Teams
- Implement Calendar View for Date and Events Tracking
- Utilize @Mention Your Teammates to Trigger Notifications
- Grid View for Bulk Actions
- Notifications for Updated List Applications
- Enhance Display of List Items with Conditional Formatting
- Easy List Sharing and Collaboration
- Create List Applications from Excel Documents
Microsoft Lists allows users to easily add, edit, and delete items from a list, and all these aspects are covered in the video and explained in details. The process of creating views, switching between them, and saving customized views is taught precisely.
Microsoft Lists also offers grid view mode, which offers a fixed height and autofit height options. You can also customize the view according to preferences by selecting different sort, filter, or group selections from the column headers or from the filters pane, and then save the new view.
You can learn much more by watching the informational video dedicated to Microsoft Lists on YouTube. The video will guide you in understanding all the features, benefits, and uses of this Microsoft 365 application.
More links on about How to add an image in Grid view to Microsoft list
- Add or edit list items
- Select Edit in grid view. Double-click a cell to make a change. To quickly edit multiple values in a column at once, select the cell ...
Keywords
Microsoft List image addition, Grid view image, Add image Microsoft List, Microsoft List Grid view, Insert image grid view, Modify Microsoft List, Microsoft List customization, Image Grid Microsoft List, Enhance Microsoft list, Microsoft List image integration.