- All of Microsoft

How Schedule Recurring Emails in Outlook via Power Automate
Content Creator & former Microsoft Product Manager
Master Microsofts Power Automate with this step-by-step tutorial, learn how to automate recurring emails in Outlook with maximum efficiency.
In this video tutorial by Kevin Stratvert, viewers learn how to create and send recurring emails using the Microsoft tool, Power Automate. Power Automate lets users build automated workflows that bridge various applications and services, enhancing efficiency across a range of tasks such as email sending, data updates, report generation, etc.
- Establishing a new flow from a template
- Setting up the recurrence trigger
- Adding the Outlook connector and the send an email action
- Customizing the email content and the list of recipients
- Testing and running the flow
At the tutorial’s conclusion, viewers will have gained aptitude at sending recurring emails via Power Automate.
Detailing the Steps
To commence, users must log into Outlook.com. Following successful login, users should click the app launcher in the top-left corner and locate Power Automate. Power Automate can be availed by personal, work, or school Microsoft account holders. On Power Automate's main page, users should click the 'Create' icon.
Next, users should opt for 'Schedule cloud flow', allowing them to define when and how frequently the emails should be sent. They can give a name to this new flow and detail when and how often the email should be issued—from months to seconds interval.
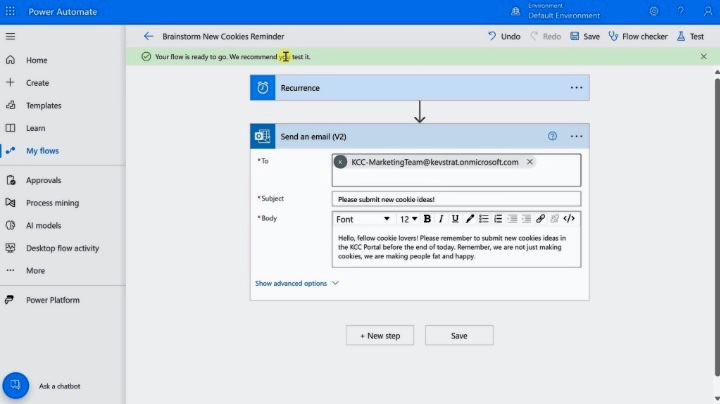
Once the flow is created, users can modify the recurrence by clicking on the step in the flow. Specific timings can be set, such as 8 am, removing the need for manual email sending.
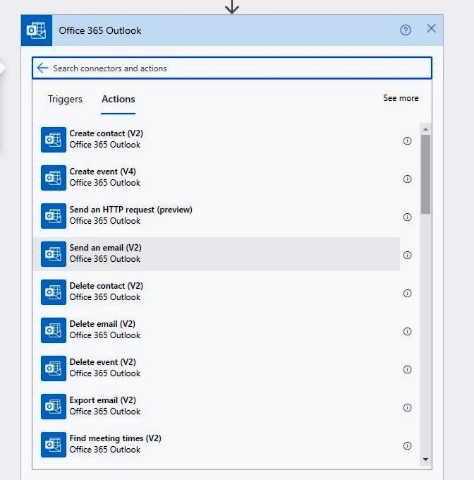
With the recurrence set, users move to the next step, choosing an operation. Typing "Outlook" narrows down the options to Office 365 Outlook or Outlook.com for setting up recurring emails, applicable for both free and paid subscriptions. The latter follows by selecting 'Send an Email (V2)' from the listed actions. The advanced options section allows adding people to cc, bcc, or even adds attachments. Finally, users can save and test their new flow.
In 'My Flows', users have control over their recurring emails, from manual sending, reviewing email logs, editing the email, or even pausing or deleting it. Mastering these steps, all users can configure a customized recurring email.
General Thought on Power Automate
Power Automate is an essential tool within Microsoft’s arsenal, designed to increase efficiency and streamline operations and communications. With its intuitive interface and a wide range of applications, it enables users to automate complex processes effortlessly. Its flexible adaptability across platforms, makes it an indispensable tool in any technological toolkit. From setting up recurring emails, as demonstrated in Kevin Stratvert's tutorial, to automating elaborate workflows, Power Automate truly caters to the needs of a modern digital workspace.
How to Send Recurring Email in Outlook with Power Automate
How to schedule repeated emails in Outlook via a Microsoft's automation service, herein referred to as Automated Task Service, will be outlined in this step-wise guide. This free service by Microsoft allows you to set up automated operations between different apps and services. A use case scenario includes automating tasks like sending emails, updating data, generating reports, among others.
In this guide, we will walk through the process of creating a 'flow' that sends an email every week to a designated list of recipients. This tutorial can be very beneficial if you need to send reminders, newsletters, updates, or any other email on a recurring basis. You will learn the nitty-gritty of:
By the end of this guide, you will have a proper understanding of how to send recurring emails in Outlook using Automated Task Service.
To begin, log into Outlook.com. Once you're in, click on the app launcher located at the top left-hand corner and navigate to Automated Task Service. Note that Automated Task Service is accessible with personal, work, and school Microsoft accounts.
On the opening page of Automated Task Service, click on the "Create" button.
The next step is to click on "Schedule cloud flow". This particular flow helps you determine when and how frequently the email should be dispatched.
After doing this, a dialog box will open where you can name your new flow. Additionally, you can specify when the flow should become active. The flow automatically becomes active instantly once you create it. Here, you can also preset how frequently the recurring email should send out. Choices range from months to seconds, so you can configure it to send out messages on a weekly or monthly basis.
Once you're done setting up, clicking on "Create" realises the flow. You can always go back for modifications. To adjust the recurrence, simply select the step in the flow. Precise timing for when the recurrence should trigger can also be changed, you might, for example, prefer to send an email exactly at 8 AM in your time zone.

After setting up the recurrence, click on "Next Step". On this new screen, you can select an operation. Type in "Outlook" to narrow down the functions to only Outlook-related ones. Choices include using Office 365 Outlook or Outlook.com to schedule recurring emails.
Select Outlook.com and you'll see a list of possible actions. Click on the Send an Email (V2) action.
At this stage, you can write out your recurring email details. Clicking on "Show advanced options" grants more features like adding people to cc, bcc, or even attaching documents.
After finalising your settings, click on "Save" to activate your new flow. A functionality test can be done by sending a test email to all the recipients. All your recurring emails can be reviewed by selecting "My Flows" on the side menu.
In "My Flows", the automated email can be manually sent, a log of all the emails sent can be viewed, modifications can be made, and you can also pause or delete them.
And voila, you've successfully set up a recurring email mechanism. Let us know if you have any questions on the procedure in the comments below.
More links on about How to Send Recurring Email in Outlook with Power Automate
- How to schedule emails using Microsoft Power Automate
- Sep 6, 2022 — In the left pane, click Create and then choose Scheduled Cloud Flow. In the resulting dialog, create the schedule you see in Figure B and then ...
- Send an email on a schedule | Microsoft Power Automate
- Send an email on a schedule. By Microsoft Power Automate Community. This flow will send an email out from your SMTP server on a frequency you define.
Keywords
Outlook Recurring Email, Send Recurring Email in Outlook, Outlook Power Automate, Automate Email Process in Outlook, Microsoft Power Automate Guide, Email Automation in Outlook, Power Automate Recurring Email, Microsoft Outlook Email Tips, Power Automate Email Tips, Scheduling Recurring Emails in Outlook.