- All of Microsoft

Power Automate: How to Save Email Attachments to SharePoint
Learn how to use Power Automate to monitor your inbox and save email attachments directly to a SharePoint folder.
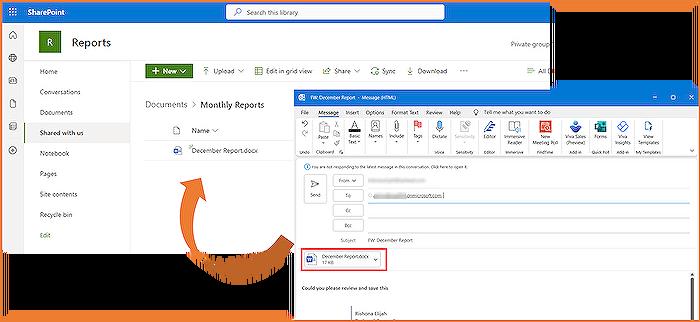
In this blog post, Microsoft MVP Rishona Elijah demonstrates how to save email attachments to SharePoint using Power Automate. She walks readers through setting up a 'flow' to monitor the user's inbox and automatically save attachments from incoming emails, excluding email signatures, directly to a SharePoint folder. This systematized process eliminates manual tasks, making it a time-saving tool for users.
Rishona uses an Outlook trigger, 'When a new email arrives (V3)', in setting up the flow. She highlights the importance of setting the Include Attachments option to Yes and Only with Attachments to Yes to ensure appropriate collection of email attachments. She offers further guidance on how to filter subject lines, using multiple words in the Subject Filter for more specific functionality.
She explains the need to use the 'Apply to Each' control in the next step to save each attachment individually. This control uses the Attachments dynamic content in its field. She also provides an efficient solution to avoid creating files for email signatures that are treated as attachments; by setting up a condition in the 'Apply to Each' control where Attachments Is Inline (dynamic content) is checked to be false.
She then directs readers on how to add the relevant SharePoint 'Create File' action within the If-Yes branch of their flow. She guides users to select their Site Address and Folder path where they prefer to save their attachments. If the site address is not listed, she suggests a custom value with a standard SharePoint site URL format. She continues to talk about selecting a specific folder, advising users to click on the Simple Documents' folder icon to see the folders on their SharePoint site.
Finally, she instructs users to set the File Name field to Attachments Name dynamic content and the File Content field to Attachments Content dynamic content. After saving and testing the flow by sending a test email, users can see the attachments uploaded to their SharePoint site. Easy and convenient, this flow automates the process of sorting and saving valuable attachments.
For more details, visit this link.
A High-level Overview on Power Automate
Power Automate, previously known as Microsoft Flow, is a tool developed by Microsoft to help users automate repetitive tasks across multiple applications and services. It allows users to create and enforce workflows with the ease of drag-and-drop actions. It integrates seamlessly with numerous Microsoft services including, but not limited to, SharePoint and Outlook as well as third-party apps, enabling companies to drive automation in their daily operations and thus enhancing their productivity.
Read the full article Save email attachments to SharePoint with Power Automate
Learn about Save email attachments to SharePoint with Power Automate
Our focus here is a simple, automated task frequently utilized in corporate environments, saving email attachments to SharePoint. This task can be easily executed with Microsoft's powerful cloud-based service, often referred to as Modern WorkFlow.
Why might this be beneficial? Consider the number of email attachments you receive on a daily basis. Sorting through each of these can be a real time sink. However, with a well-configured automated workflow, those files could be instantly saved to a SharePoint folder, allowing easy access and organization.
A crucial factor in setting this up, is the 'trigger' of the flow. This article uses the Outlook trigger 'When a new email arrives (V3)' in Modern WorkFlow. This trigger listens to your inbox, and sparks the flow when specific criteria are met. Such predetermined criteria might be 'Include Attachments: Yes' and 'Only with Attachments: Yes'.
One neat feature that can be incorporated here is adding multiple keywords to the Subject Filter. By doing so, the flow can be designed to activate when an email arrives with a subject line containing any of those keywords.
After setting up the trigger, the next significant step is to include an 'Apply to Each' control. This ensures that every attachment in an email will be saved separately, and not bundled together in a single file. An important note here is the need to select 'Attachments dynamic content' in the 'Apply to Each' field.
One problem that can arise in this process is the matter of email signatures. Often, email signatures are recognized as attachments and end up being saved alongside your crucial files. To prevent this, a condition can be set that instructs the automated workflow to treat 'Attachments Is Inline (dynamic content)' as false, effectively ignoring the signatures.
Once the email attachments have been successfully identified and sorted, the next stage involves saving them to SharePoint. This task is accomplished using the 'Create File' action in SharePoint. With this action, one can chose a specific location in SharePoint to save the attachments. These locations are specified using the 'Site Address' and 'Folder Path' fields. In case the preferred site address does not appear in the provided options, one can manually paste the URL of the preferred SharePoint site.
To exactly choose the folder in SharePoint to save to, navigate through the folder icon next to Shared Documents. From here, a list of all folders in the SharePoint site will appear. To set the name and content of the file being saved, simply set 'File Name' and 'File Content' to 'Attachments Name dynamic content' and 'Attachments Content dynamic content' respectively.
Following the successful creation and saving of the file, it becomes crucial to test the flow to ensure it functions correctly. This can be done by sending an email to yourself, ensuring the email meets the criteria that activates the trigger. Following successful execution of the flow, the attachments should be visible in SharePoint. Should they not be, a quick refresh of the SharePoint site should show the newly saved attachments.
If you're someone frequently dealing with numerous email attachments, this automated workflow could be a significant boost to productivity and organization. Furthermore, the skills and knowledge gained from setting up such a flow can be easily applied in introducing further automation and efficiency into your workflow.
More links on about Save email attachments to SharePoint with Power Automate
- Save my email attachments to a SharePoint document library
- When an email with an attachment arrives in the Inbox folder, save the attachment file in SharePoint document library. You can also use filter to run flow ...
Keywords
Save email attachments, SharePoint, Power Automate, Email to SharePoint automation, File storage automation, Business process automation, Microsoft Power Automate, SharePoint Document management, Email attachment saving, Power Automate workflows.